
TeensyStep
TeensyStep is a highly efficient Arduino stepper motor library compatible with the PJRC boards Teensy 3.0, 3.1, 3.2, 3.5 and 3.6. The library is able to handle synchronized as well as independent movement of up to 4 groups of up to 10 motors to their target positions. In addition to the target mode TeensyStep provides a continuous rotation mode. In this mode the steppers can be rotated using fixed rotation speeds. The rotation speed can be changed on the fly with keeping the motors in sync. In both modes, pulse rates of up to 300’000 steps per second are possible.
Quick Demonstration
In the video below the two motors are accelerated to 160’000 steps per second. Besides the high step frequency it demonstrates that both motors move synchronized not even at their target speeds but also during the acceleration and deceleration phases.
Why would you use TeensyStep
A lot of interesting projects require the movement of things. An easy way to implement such a transport system is the use of stepper motors driven by readily available stepper drivers. Those drivers usually expect simple step and direction signals to move the motors. However, due to the motor inertia they can not be started at full speed but need a smooth acceleration or deceleration to the final velocity. Otherwise the motors can skip steps and the step counters maintained by the application can run out of sync with the real motor positions (steploss errors).
Practically all modern stepper drivers can operate in a so called microstepping mode where the mechanically fixed step positions (usually 200 per rev) are electronically subdivided into a number of microsteps. While microstepping is great to increase resolution and to reduce vibration at low velocity it requires high pulse rates at even moderate motor speeds.
Lets look at a typical example:
Assume we have a standard 1.8° stepper (200 stp/rev) and want to run it at a speed of 1200 rpm in 1/16 micro stepping mode. The required pulse rate \(r\) can be calculated by: \[r = 16\cdot \frac{200\,\text{stp/rev} \cdot 1200\,\text{rev/min}} { 60\,\text{sec/min}} = 64000\,\text{stp/sec},\]
which is pretty demanding.
Of course, there are other Arduino stepper libraries available. E.g. the well known AccelStepper, the standard Arduino Stepper Library or Laurentiu Badeas Stepper Driver to name a few. However, I found none which is able to handle accelerated and synchronous moves of more than one motor at the high pulse rates required by microstepping drivers.
Key Specifications of TeensyStep
| Description | Specification | Default |
|---|---|---|
| Motor speed / pulse rate 1) | 1 - 300’000 stp/s | 800 stp/s |
| Acceleration 2) | 0 - 500’000 stp/s² | 2500 stp/s² |
| Pull in speed 3) | 50-10’000 stp/s | 100 stp/s |
| Synchronous movement | up to 10 motors | - |
| Independent movement | 4 groups of 1 to 10 motors | - |
| Settable step pulse polarity | Active HIGH or LOW | Active HIGH |
| Settable step pulse width | 1-100µs | 5µs |
| Settable direction signal polarity | cw / ccw | cw |
[1] Depending on Teensy model
[2] An acceleration of say 1200 stp/s^2 will accelerate the motor from 0 to 1200 stp/s in 1 second, or from 0 to 2400 stp/s in 2 seconds…
[3] This is the speed up to which the motor can start without acceleration.
Usage
Stepper Class
The stepper class encapsulates all physical properties of a stepper motor
- Pin numbers of the STEP and DIR signals.
- Maximum speed and maximum acceleration of the motor.
- Settings for STEP and DIR pulse polarity. I.e., does your driver require active high or active low step pulses or inverted rotation direction.
- The pull-in speed of the motor (pull-in speed is the speed up to which the motor can be started without the need for acceleration).
In addition to those static properties, the stepper class has member functions to set the target position of the next movement to an absolute position or to a position relative to the current position.
Here a short snippet showing the usage of the stepper class
// define a few motors
Stepper motor_1(2,3); // STEP at pin 2, DIR at pin 3
Stepper motor_2(4,5); // STEP at pin 4, DIR at pin 5
Stepper motor_3(6,7); // STEP at pin 6, DIR at pin 7

void setup() {
    // Setup some motor properties
    motor_1.setMaxSpeed(64000);         // stp/s
    motor_1.setAcceleration(200000);    // stp/s^2

    // you can also use a 'fluent interface' to set the properties
    motor_2
        .setMaxSpeed(30000)             // stp/s
        .setPullInSpeed(800)            // stp/s
        .setAcceleration(150000);       // stp/s^2
    motor_3
        .setStepPulsePolarity(LOW)      //motor connected to an active low driver
        .setInverseRotation(true)
        .setMaxSpeed(45000)             // stp/s
        .setAcceleration(200000);       // stp/s^2
}
Set Target Positions and the Internal Step Counter
The stepper class keeps track of the current position and is used to set a new target position. Target positions can be set absolutely or relative to the current position.
unsigned pos = motor_1.getPosition(); // get current position of the motor
motor_1.setTargetAbs(pos + 100);      // sets the target position 100 steps ahead of the current position
motor_1.setTargetRel(100);            // does the same thing directly
The following code advances the internal step counter by 1000 steps without generating any movement.
int pos = motor_1.getPosition();      // get the current value of the step counter (position)
pos += 1000;
motor_1.setPosition(pos);             // set a new value of the step counter (this does not move the motor)
StepControl Class
The StepControl class is used to actually move the motors to their target positions.
StepControl<> controller;                   // construct a controller object

controller.move(motor_1);                   // this will move motor_1 to its target position
controller.move(motor_2, motor_3);          // moves motor_2 and motor_3 to their target positions

motor_1.setTargetAbs(0);
motor_2.setTargetAbs(0);
motor_3.setTargetAbs(0);
controller.move(motor_1, motor_2, motor_3); // move all motors back to the starting position
The move command is blocking. I.e., it will not return until the movement is finished. If you need to do some work while the motors are rotating you can use the non blocking moveAsync command.
controller.moveAsync(motor_1, motor_2);     // This will start the movement and return immediately
doSomeWork();

while(controller.isRunning()){              // wait until the movement is finished
    delay(10);
}
Stopping a movement
You can stop the movement of the motors at any time with the stop() and stopAsync() commands. Both commands will decelerate the motors in the normal way to avoid steploss.
controller.stop()      // stops the movement and waits until all motors stand still
controller.stopAsync() // initiates the stopping sequence and returns immediately
In case of an emergency you can immediately stop the movement at any time by calling. Since this command will stop the motor without any deceleration a loss of steps is very likely. You probably need to do a homing cycle after an emergency stop.
controller.emergencyStop() // stops the movement immediately
RotateControl Class
Instead of moving to a fixed position you can also initiate a synchronous rotation of one or more motors. You need the RotateControl class for this. The following code starts a rotation of two motors. The first motor rotates with 50000 steps/sec the second one with 150’000 steps/sec. After 5s both motors are stopped. The speed ratio of both motors is kept constant event during acceleration / deceleration phases.
Stepper motor_1(0,1) , motor_2(2,3);
RotateControl controller;

motor_1.setAcceleration(10000);
motor_1.setMaxSpeed(50000);
motor_2.setAcceleration(10000);
motor_2.setMaxSpeed(150000);

controller.rotateAsync(motor_1, motor_2);   // start synced rotation of both motors

delay(5000);                                // stop rotation after 5s
controller.stop()
Negative values of the setMaxSpeed parameter will rotate the motor in the opposite direction.
Change Rotation Speed On-The-Fly TBD
controller.overrideSpeed(0.5);
Movement Modes
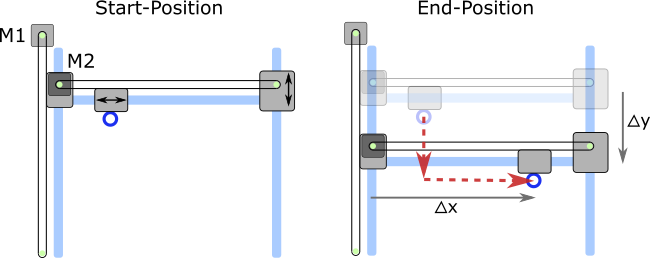
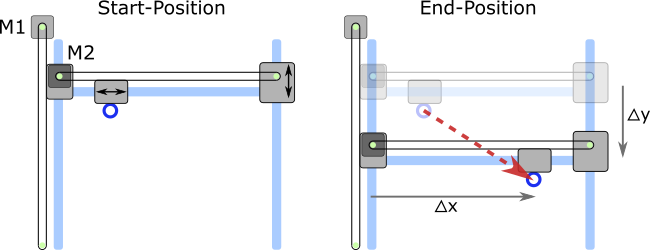
If you want to control more than one motor there are three different possibilities to do so. Lets assume the standard belt driven x/y transport shown in the figures below. There are two motors (M1 and M2) which move a load (symbolized by the blue ring) on linear guides (pale blue). M1 moves the load in y-direction and M2 in x-direction.
Sequential Movement
The simplest thing you can do is to move the motors one after the other:
...
StepControl<> controller;

M1.setTargetAbs(targetY);
M2.setTargetAbs(targetX);

controller.move(M1);           // Move M1 to the target position (targetY)
controller.move(M2);           // Move M2_to the target position (targetX)
The resulting movement is shown in the figure below.
Synchronous Movement
If you want to move on a straight line between the two positions StepControl needs to adjust the step rate of one of the motors in relation to the other. Of course, this adjustment is necessary during the complete movement including the acceleration and deceleration phases. StepControl uses Bresenham’s line algorithm to do this adjustment.
Using synchronous movements with TeensyStep is easy: the controller accepts up to 10 motors in its move and moveAsync command. All motors which are passed to the commands will be moved synchronously.
StepControl controller;

M1.setTargetAbs(targetY);
M2.setTargetAbs(targetX);

controller.move(M1, M2);        // Move M1 _and_ M2 to the target position
The resulting movement is shown in the figure below.
Independent Movement
Sometimes it is necessary to move one or more motors independently but at the same time as the other motors. Lets extend our example by another transport module (motor M3) which can move left / right only. This transport is supposed to bring fresh samples (red dot) to a transfer area. This transport shall be done independently of the x/y transport which is still moving around. To accomplish this we need to create a second controller for motor M3.
StepControl<> controller_1;
StepControl<> controller_2;

controller_1.moveAsync(M1, M2);   // synchronous movement of M1 and M2
// ... more controller_1 movements....

M3.setTargetAbs(transferAreaPos);
controller_2.moveAsync(motor_3);  // move M3 to the transfer station, independent of M1/M2 movements which run in parallel
...
while(controller_1.isRunning() || controller_2.isRunning()){  // wait until both controllers finished their movements
    delay(10);
}
// do the sample transfer...

Used Resources
StepControl and RotateControl
Each StepControl object requires one IntervalTimer and two channels of a FTM timer. Since all supported Teensies implement four PIT timers and the FTM0 module which has 8 timer channels the usage is limited to 4 StepControl objects existing at the same time. In case you use TeensyStep together with other libraries reserving one ore more IntervalTimer the number of available StepControl objects is reduced accordingly. You can use the isOK() member to check if the Controller object was able to reserve a IntervalTimer.
StepControl<> cnt1;
StepControl<> cnt2;
StepControl<> cnt3;

if(!(cnt1.isOk() && cnt2.isOk() && cnt3.isOk()))
{
    panic();
}
A StepControl object requires 96 bytes of stack or static memory.
Stepper
You can define as many Stepper objects as you like. Stepper objects do not use any system resources except 56 bytes of stack or static memory.
Performance
The table in the figure below shows some information about the performance of the library. To estimate the generated processor load we need to know the time it takes for handling acceleration, Bresenham algorithm and switching the STEP and DIR signals. The experiment was done by setting a digital pin to HIGH when the processor enters the corresponding ISR and back to LOW when it leaves it. The actual times were measured with a logic analyzer, the processor load was calculated for various conditions and processors. (The .xlsx spreadsheet can be downloaded here).
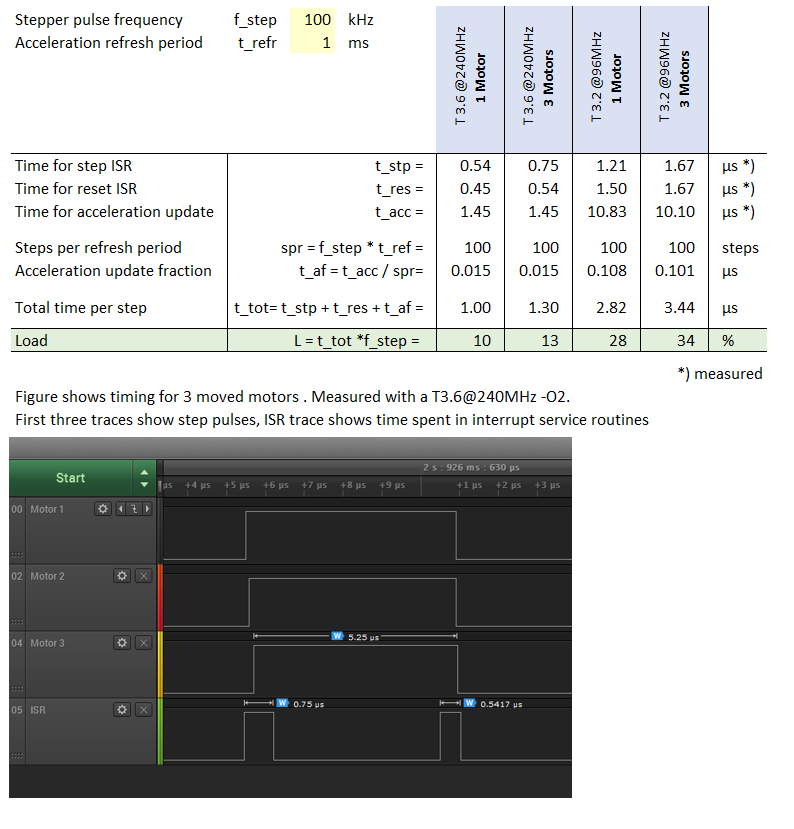
Summarizing: Moving one motor at 100kHz generates a processor load of about 10% for a T3.6 and some 28% for a T3.2. Handling 3 motors at that speed generates a load of 13% and 34% respectively. The results roughly fit to the difference in the clock frequency of both boards. Numbers in the table are linear in motor speed, i.e. half the step rate generates half of the load.